Thursday, March 31, 2011

Cactus vs Fungus

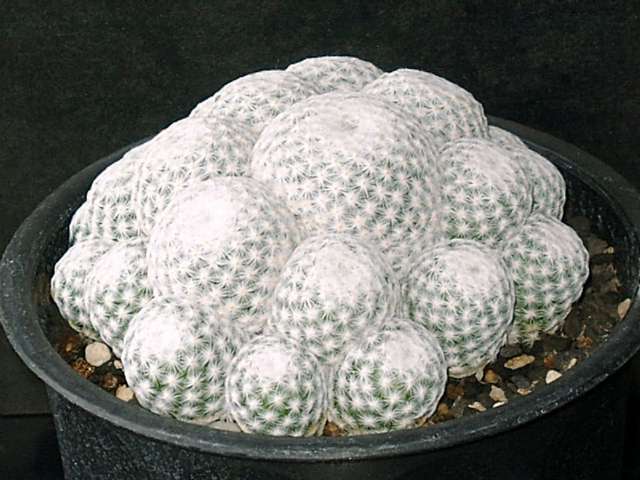
Here are the fungus found normally in cactus.

1. Cactus Anthracnose (fungus – Colletotrichum (Gleosproium) spp): This disease affects several kinds of cacti, cereus, echinocactus, mammillaria, and particularly, opuntia (prickly pear). Infection results in a rather moist light brown rot that shows many light pink pustules on the surface. Spots are small at first, later enlarge, and become covered by the small spore-producing pustules. 
Large areas may be affected, sometimes destroying entire plants. No satisfactory control is available, other than removing and destroying diseased cladodes as soon as noticed. In the greenhouse, soil from infected plants should be removed and benches disinfected. Spraying with a copper fungicide may help in checking this disease.

2. Scorch or Sunscald (fungus – Henersonia opuntiae): This disease is common and
serious on prickly pear cactus (opuntia). Spots at first are distinctly zoned, later enlarging until entire cladodes turn a reddish-brown and finally die. The center of the disease area is grayish-brown and cracked. Other fungi may be present in the diseased area. No practical control has been developed.

3. Cotton Root Rot (fungus – Phymatotrichum omnivorum): Several members of the
cactus family are susceptible to attack by the cotton root rot fungus. Infected plants die.  When pulled from the soil the brown strands of the fungus can be found growing on the root surface. No control practice is available.

4. Scab (physiological): Particularly common on prickly pear cactus. Rusty colored, corky areas appear on the stems. Scab is thought to be a form of edema, resulting from over watering and poor ventilation. Increase light and decrease humidity for control.

What to do when cactus are infected?

  •        Quarantine and remove infected plant material.  
  •        Repot and cut off the infected area if it’s not severe and it’s possible to cut.  Cut behind the infection so that you can throw the fungus away entirely.  If it’s severe, destroy affected plants and their pots.
  •         Set the environment of your greenhouse or garden to be more appropriate for the cactus.  The causes of fungus are sometimes poor ventilation, light or humidity.
  •          Dust the both infected and healthy plant with Bordeaux mixture or another fungicide.  
Preventing the fungus 

1. Back the basic, pay attention and take care of your plants closely.  Mostly, the infection can invade your garden when you don’t have time to check or care the cactus.  (This case ever happened with me, too)

2. Get rid of the fungus/infection as soon as you find it.  The earlier to figure the fungus, the easier to control it.


3. Giving more time to spray the fungicide (every one or two weeks), repot and fertilize the plants.

Every plant is same; cactus, succulent, orchid, rose or else.  If you take care of it well, it will grow up greatly and make you proud


If you have any comment or question, please feel free to contact me :)

Monday, March 14, 2011

When is the time to repot the cactus???

Normally, we should repot the cactus at least once a year but if you want the cactus to grow faster, you may change its pot every 5-7 months upon the size and age of the plant.

However, somebody who is very lazy (like me) may repot when it’s really necessary.  When is it???  You can notice the good time to change the cactus pot when
Hard top soil

  •  Cactus size is too big for the pot 
  • Cactus is growing slowly
  •  The top soil is so hard 
  • Root on top soil
  • Cactus root’s is on the surface of the pot because there is no more food/fertilizers at bottom of pot.  (Sometimes, it’s true but I have an experience: one of my cacti grown on the surface.  At that time, I changed its pot and its root was still on the surface again.  I re-potted again and its root was still on the top of the pot.  I asked my cactus advisor and she said that’s the habit of that cactus.)

my Pachypodium
However, you should know about the dormant period of each cactus & succulent.  For example, my Pachypodium always leave its leaves and stop growing since October. It will have new leaves and grow up again at the beginning of rain season (about May).  So I repot it before May.  Dormant plants are weak and can't really defend themselves against infection.  Meanwhile, any damage done to the roots during repotting will be dangerous to the plants.

Right Season to do it

Normally, I’d recommend before or at the beginning of the rain season because it’s not too dry or too wet.  And the new pot can support the plant growth in the rainy but you should be careful about the infection and being rotten if you repot during the rain season.  So please change the pot before the rain comes.

However, that’s the general suggestion.  You should understand your plants well.  There are some species that can tolerate every thing you’ve done with them, but others could not truly tolerate any stress.  So please pay attention and time to observe your cactus.

Monday, February 21, 2011

Mammillaria herrerae Care

Scientific name:  Mammillaria herrerae
Origin:  Queretaro, Mexico
Habitat:  It grows mainly in open places between grasses and calcareous rocks, in association with other cactus species like Echinocactus grusonii, Ferocactus hystrix and Thelocactus leucanthus.  


Description: It is small growing cactus that look like a little golf ball.  It usually stays solitary, or occasionally clusters from the base.
Stems: Globose or slightly elongated as it ages, 2 - 3.5 cm in diameter and height. (In cultivation it can grow very slowly up to 8 cm tall)
.  Without latex.
 
 Flower: Diurnal, quite large for a Mammillaria, pale pink to red-violet, 20 - 25 mm long and very showy.
Blooming season (Europe): April to May, it starts flowering when it gets to be 5-7 years old, and reaches at least 3 cm in diameter.

Lighting: 
Requires maximum sun exposure to reach its full potential, and  to achieve success in flowering 


Cultivation: This plant isn't famous for being easy to cultivate, but in good conditions with excellent ventilation, it grows without difficulty.  It is especially sensitive to overwatering. So careful watering and an open mineral potting soil are a must.  Avoid the use of peat or other humus sources in the potting mixture.  


Don't add limestone to the potting mix (which must be moderately acidic).  It can be sensitive to frost (but if dry they are resistant to -5° C).   A winter rest that allows the plant to shrivel (perhaps losing up to 25% of its summer height) will encourage flowering and long time survival.  Be careful to encourage slow growth.


Propagation: Direct sow after last frost. (it usually doesn't  produces offsets).


Tuesday, February 8, 2011

Make a self-watering container

Have you ever got a problem who would water plants when you're away or had a holiday? Here, I've the video showing how to make a self-watering container simply.


source: Videojug

Monday, January 24, 2011

Haworthia fasciata

Plant Family: Liliaceae
Plant Botanical Name : Haworthia fasciata
Common Name: Zebra haworthia
General Description
Comprising about 70 species of small, succulent, cold-tender perennials, this southern African genus contains many excellent subjects for containers or frost-free gardens. Most cultivated haworthias come from desert or semi-desert regions of South Africa that receive little or no summer rainfall.
Most Haworthia species form ground-hugging or short-stemmed rosettes of fleshy, somewhat triangular, firm- or soft-textured leaves. The leaves of several species (including H. cymbiformis) have a mosaic of translucent "windows" at their tips, which admit light to an interior layer of photosynthesizing cells. Warty silver-gray tubercules mark the leaves of some species (such as H. attenuata), giving them an almost reptilian appearance. Still others (H. arachnoidea, for example) produce spherical rosettes covered with a cobweb of fine white bristles. Among the most striking and sought-after haworthias are H. truncata and its allies, whose "sawed-off" leaves resemble miniature stone columns.
Many haworthias multiply rapidly into sizable clumps when grown in optimal conditions. Most have fleshy roots, but a few are tuberous-rooted.
Haworthias are not showy bloomers, producing small, pale, tubular flowers on tall, thin, wiry stems. Blooming season differs among species. Plants sometimes set seed, which if sown may result in hybrid seedlings. Many formerly supposed species of Haworthia are now known to be hybrids.
These succulents do best in porous soil and bright filtered light. Water sparingly in summer and winter, and more frequently in spring and fall. Haworthias take very well to container culture and are splendid in decorative pots. Drought and sun may cause reddening of the leaves. Plants are easily propagated by separation of rosettes.
Characteristics
  • AHS Heat Zone: 12 - 10
  • USDA Hardiness Zone: 10 - 15
  • Sunset Zone: 12, 13, 21, 22, 23, 24
  • Plant Type:   Succulent
  • Sun Exposure: Full Sun, Partial Sun
  • Height: 1"-4" / 2.5cm - 10.2cm
  • Bloom Time: Early Spring, Spring, Late Spring, Early Summer, Summer, Late Summer, Early Fall, Fall
  • Native To: Southern Africa
Growing Conditions
  • Soil type: Loam, Sand
  • Tolerances: Drought
  • Water Requirements: Keep the soil barely moist and if you use rainwater, be careful as it could be acidic. Use warm water.
  • Fertilizer: Feed only twice a year, once in April and once in July with a water soluble fertilizer.
Tip &Advice: Be careful not to over-water. Put a layer of small gravel at the bottom of the pot and also one inch on the top of the soil to prevent stem rot. Repot this plant in the spring and use a shallow pot.

Tuesday, December 28, 2010

Peat moss: use and benefit

What is peat moss?
Peat Moss, as used in gardening, is a fibrous, decomposed remains of these certain types of moss, which are found in very wet areas of the country. It is a highly prized natural plant food and can be used as a covering or mulch like substance for seeded areas.
Why should we use peat moss?
Peat moss has many benefits to plants and especially, it’s very helpful to seed the cactus & succulent.  

- improve compost

-    condition the soil : Peat moss is ideal for improving the texture of the soil, and when  added to garden soil it will stop nutrient runoff from occurring by holding water and nutrients in soil.

- Adding peat moss to clay soils can help break down clay by aerating it and applying peat moss to sandy soils will help bind it and retain nutrients rather than leach them.


I was told by a cactus experts that he used the peat moss and pumice (volcanic rock) when he seed the cactus.  That would increase the survival rate of the baby cactus.  But the peat moss would be dry quickly so you should often water the cactus with peat moss.
By the way, coconut fibre can uses as a valid substitute for peat moss. It has many of the same qualities inherent in the moss yet is more environmentally friendly. Coconut fibre is sourced from the husk fibres of coconuts and has given some hope for normally what is seen as a waste product.  
I cover the top of soil of the flower and the vegetable with the coconut fibre  as it can keep moisture in the soil.  But for the cactus & succulent, coconut fibre is not the good choice because coconut fibre holds water in the pot and that can cause the plants being rotten.
Where to find peat moss?
In local farm supply, outdoor or gardening section of most department stores

Wednesday, December 8, 2010

Human urine as organic fertilizer

Generally, urine is the liquid waste from our body but in the Asian agriculture, it’s common to use urine as a good source of nitrogen and other minerals and, providing it is used correctly, is completely safe.  The research at University of Kuopio's Department of Environmental Sciences in Finland assumed that the nitrogen contents of human urine could be a good fertilizer for many other plants or crops.  

The study said that the cabbage fertilized with urine was compared with similar plots of cabbage that either went unfertilized or where commercial fertilizer was used. At harvest, the cabbage enriched with the urine had several advantages: It was slightly larger, it grew to its maximum size more quickly, and, for most of the growth cycle, it suffered less bug damage than the commercially fertilized variety.

I tested to water with the mixed urine 2 times a week in the morning and now, my plants (such as vegetable, roses, orchid, cactus and etc.) grow well and quickly like they do in the rain season. 

How to keep and use it
  • Keep it separate. The golden rule with urine use is to keep it separate from other bodily wastes. Urine is clean and needs to be kept that way. Pee in a bottle, or invest in a urine-separating toilet.
  • Dilute urine with water at 1: 10.  The pure urine is too strong and salty to be used neat on plants.    
  •  Use it fresh. We all know that stale urine smells. That's ammonia, and it's made from nitrogen. The smellier your collected urine, the less nutritious it will be for your plants, as well as being unpleasant to apply.
  •   Water at the roots. It's good practice when watering not too splash the leaves, but to water at the roots. This saves on evaporation, and dry leaves are much more resistant to disease.
  • Feed hungry plants. The plants that will benefit most from urine fertilizer are the ones with the highest nitrogen requirements. Try it on leafy vegetables like cabbages and cauliflowers, corn, or anything that needs a quick pick-me-up.
Other use. 

Neat urine is too strong to be used directly on plants, but it can be used as a weedkiller; a few applications, especially if used on hot days, should finish off your weeds. It can also be used neat as a winter spray for fruit trees, to discourage fungal diseases.

Using urine is the real organic gardening: it is a relatively clean substance.  You can save money, fossil fuels (used extensively in the production of chemical fertilizers) and water (no need to flush!).