I think person who likes cactus should not miss Pachypodium because it's a succulent plant and has a lovely and amazing

form. Besides, its species are so various and the way to take care of them is not different from one of cacti or succulent. I falled in love with Pachypodium for a while but I don't have it much in my plant collection. I think I will keep it more and here is the brief information about Pachypodium and its sample picture of some species.
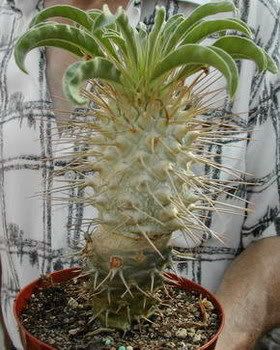
Pachypodium is a plant genus that belongs to the dogbane family, Apocynaceae. Pachypodium comes from Greek "pachy" (thick) and "podium" (foot), hence meaning thick-footed.
The pachycaule trunk is a morphologically enlarged trunk that stores water so as to survive seasonal drought or intemitent periods. Whereas there is great variation in the habit of the plant body, all Pachypodium exhibit pachycaul growth. Variation in habit can range from dwarf flattened plants to bottle shaped shrubs to dendroid-shaped trees.
The second general characteristic of Pachypodium is to have spines. The spines come clustered in either pairs or triplets with these clusters often arranged in rings or whorls around the trunk. Spines emerge with leaves, and like leaves grow for a short period before stopping growth and hardending. Spines do not regenerate so weathering and abrasion can wear away all but the youngest spines from older specimens - leaving smooth trunks and branches.

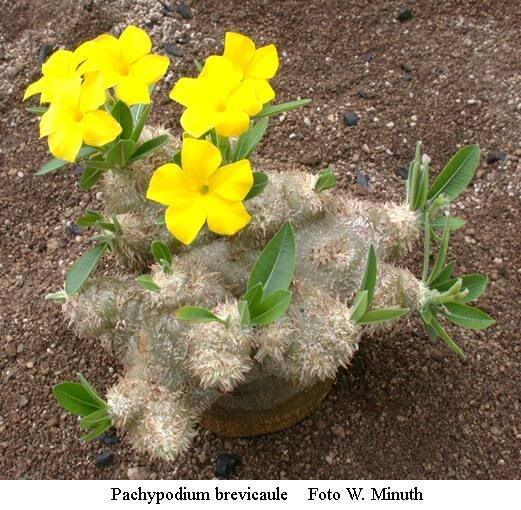
To some extent, branches are a characteristic of the genus. Some caution is warranted in over-generalizing this characteristic. Pachypodium namaquanum is often branchless. Pachypodium brevicaule has no clear branches, and indeed may have evolved an alternative to branching in the form of nodes from which leaves, spines, and inflorescences emerge. In general Pachypodium have few branches. Since the environmental stresses and factors that contribute to branching can vary widely even in small areas, individual plants of the same species exhibit wide variation in branching morphology.
Morpholigically, Pachypodium can be highly flexible in organization. Branching, if present at all, can be from the base either of the plant or at the crown. Freeform branching is a morphological adaptation to factors of the immediate microenvironment which, by their diversity, account for the wide range of habits:
• flattened dwarf species less than 8 cm tall but reaching 40cm in diameter
• bottle- or oval-shaped shrubs to 4 m tall
• both branching and unbranched cigar- and cactus-like trees to 5m tall.
Despite microenvironmental variation, Pachypodium are always succulent and always exhibit pachycaul trunks. Pachypodium are usually spinescent, but individual variation in spinescence as well as weathering/abrasion can result is plants with few if any spines.
Pachypodium trunks and branches are normally thickened with water-storing tissue. Plants must relie on the food and water stored in their thickened trunks during seasonal drought when leaves have been shed and no water is available from the substrate. In addition to the lower surface-to-volume ratio which aides in water retention, the thickened trunks and branches can also possess photosynthetic surface tissue to allow nutrient synthesis even when leaves are not present.

They should not be mistaken for roots, because the enlargement occurs above the point where the roots branch off the main axis of the trunk.
Pachypodium make use of spinescence as an adaptive mechanism responding to the landscape. Adaptively this spinescence is employed to different degree in various species to collect moisture from fogs and dews. The degree of spinescence demonstrates the degree to which species rely on spines as a means to collect moisture from microclimate conditions, such as localized dews or fogs within microenvironments, and drip to the soil immediately below the spine on a branch or branchlet.
In elevation, Pachypodium in both mainland Africa and Madagascar grow between an altitude of sea level, where some species grow in sand dunes, such as Pachypodium geayi, to 1600 m (5200 feet) for Pachypodium lealii in southern Africa and 1900 m (6200 feet) for Pachypodium brevicaule in Madagascar.
In continental southern Africa, the extreme temperatures range from -10 °C (14 °F) in some locations to as much as 45 °C (113 °F). Whereas in Madagascar, with not such a great temperature amplitude, the temperature ranges from -6 °C (21 °F) to 40 °C (104 °F).
A generalization about precipitation regimes for both southern Africa and Madagascar does not have much meaning because the habitats of Pachypodium vary so greatly with a moisture regime. A precipitation regime for a species of Pachypodium, therefore, depends upon a habitat's location relative to the influences of the Atlantic and Indian Oceans and the various mountain ranges of southern continental Africa and of Madagascar.
 a diameter of 5 inches. All of the Gymnocalycium cactus have fairly large and showy flowers which are are white, yellow, orange and pink. The flowers are borne at the growing point of the cactus on short stems.
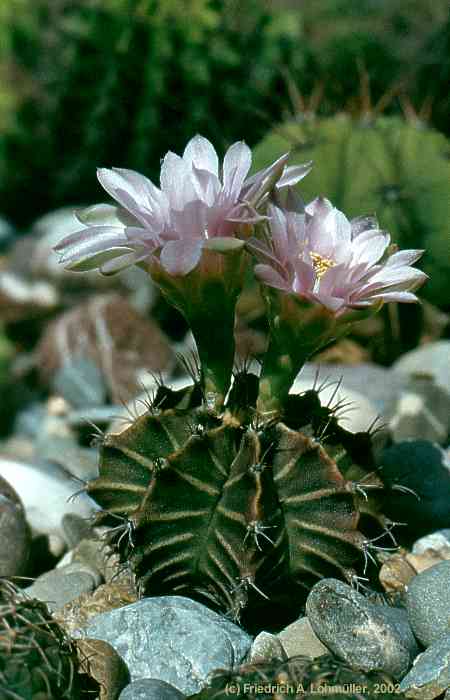


