Thursday, August 11, 2011

Ariocarpus kotschoubeyanus - living rocks


Scientific name: Ariocarpus kotschoubeyanus

Origin: Mexico (Coahuila to Queretaro)

Habitat and Ecology:  Commonly called "living rocks," they are widely distributed as a large number of small, isolated populations, generally on limestone derived gypsum silt plains and on hills. The area where they grow must be quite wet during the rainy season (Summer). These plants are extremely hidden as they blend in well with the terrain around them resembling dried mud.
When they are found, it is usually due to their pinkish flowers. In times of severe drought the whole above-ground portion of these plants can shrink and be covered by mould, but the taproot remains alive.
Although they can form clumps, often only a small disc of tubercles can be seen flat at the soil surface, however these plants grow a large tap root below the surface of the compost.

Root:  Each plant has a large turnip-like taproot, which lies below the soil surface and serves for water storage.

Cultivation:  The plants need deep pots with loose mineral soil with a well-drained stuff. They need a good amount of light, a place near the roof of the greenhouse helps drying the pot after watering.
Watering and adding fertilizer can be done weekly during summertime, if the weather is sunny enough. Kept this way, plants will show a healthy, although slow growth. They are frost hardy to -10°C.

Propagation: By seeds, remembering that seedlings dislike strong light and dry conditions.  It will be great if the seeding pot can be repotted frequently.
Eventually, when they become mature, they attain a maximum size of 5 to 9 cm. But plants are often grafted to accelerate growth as they would generally slowly grow, but the grafted plants are typical rather tall growing or become multi-heads plant, compared with plants on their own roots that are usually very flat to the ground.

Flowers: A. kotschoubeyanus have a woolly crown, from which emerge bright pink-violet flowers up to 2.5-5 cm, 2 times wider than long when fully expanded. Flowers last for 3 to 4 days.  
Blooming time: from mid-August onwards, and is easy to set seed on, it produces some interesting hybrids with other Ariocarpus species

Ariocarpus kotschoubeyanus is a variable species:

· Ariocarpus kotschoubeyanus forma mostruosa
· Ariocarpus kotschoubeyanus forma prolifera
· Ariocarpus kotschoubeyanus var. albiflorus
· Ariocarpus kotschoubeyanus var. elephantidens (which are larger, highly textured, triangulate tubercles, and a deep purple flower with little or no white content)
· Ariocarpus kotschoueyanus var. macdowellii
· Ariocarpus kotschoubeyanus var. sladovski differs from the other red flowering A. kotschoubeyanus (for having a smoother and shiny epidermis)
  
Source: http://www.cactus-art.biz

Thursday, July 14, 2011

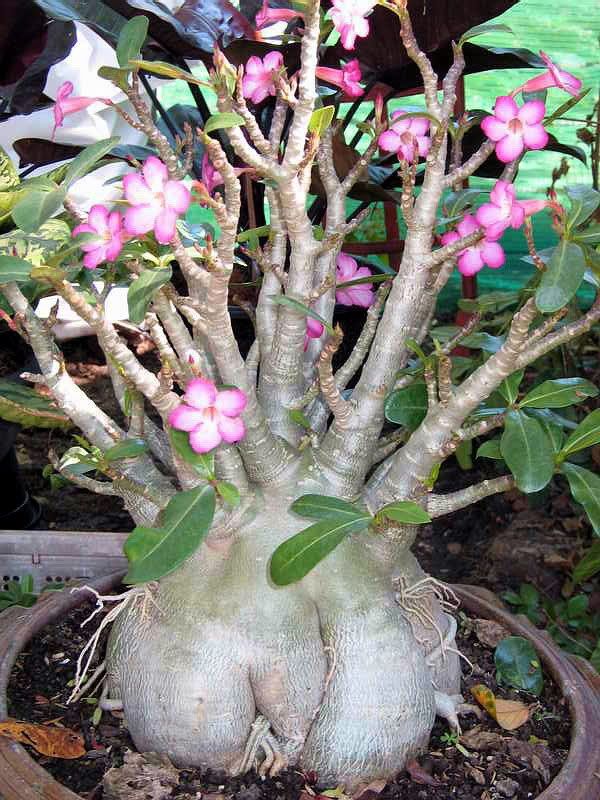
Care to Adenium – Desert Rose


A native of East Africa, the desert rose will grow from 6 ½ to 10 feet in the wild. It has fleshy leaves and beautiful 2-inch open-trumpet shaped flowers in shades from red to light pink. 

Desert Rose is excellent in pots especially for people who "kill everything" because Adenium lives with little care and can take a good deal of neglect.  Besides, the coolest Desert Rose plants are hybrids (many dozens of them) produced in China, Taiwan and Thailand, and some in India.

Watering:  Needs little water during winter, especially when kept cool. Increase water during growing and blooming periods.  If left without added water and no rain for a long time or after a cold night, your desert rose can lose most or all of its leaves.  Never fear, they will re-grow after watering or after warm weather returns. 

Soils: Good drainage is essential in any soil mix, yet the soil mix also must have moisture retention properties, along with adequate nutrients. Use a mixture of half potting soil and half perlite, which will hold some moisture but still drain nicely. If you live in a warmer climate where you can plant outdoors, you can use gravel instead of Perlite. 

Repotting: Root prune and repot ever year or two, after the winter rest period, using a good draining soil mix such as described above. Peat can also be added to the mixture. Plant can tolerate being root-bound (tight in the pot.)  

Pruning: Usually pruning is done to reduce overall plant size, or to selectively remove branches to 'sculpt' a more-perfect plant.  
Adenium flower
Do heavy pruning around March to shape the plant. Any new shoots can be pruned off at any time if you don't want them. Wear gloves and don't touch your face if you get any sap on you while pruning, as the sap is toxic. Don't let children or animals play with or around these plants either. Wash sap off with soap immediately.

 Fertilizer: Feed Adenium obesum with a general houseplant fertilizer half-strength about once or twice a month during the warm months. Blooming fertilizer may help encourage blooming during the growing season.   Along with reducing watering to increase cold tolerance, fertilization should be ended in late August or early September. Availability of nutrients (especially nitrogen) encourages the plants to remain active and produce new growth.

Light: Adenium needs lots of light and fresh air. Keep in a bright location in winter. In summer plant can be moved outside and can tolerate full sun but partial or filtered sun is fine. Plant will bloom better if getting more full sun and regular water.

Temperature: Never below 40 degrees; however, in the winter, keeping it cool (between 40 and 61 degrees) gives the plant a needed rest. 

Pest and Diseases:  The common enemies of Desert Rose are aphids, caterpillars, sometimes scale insects and fungus.  Bugs are pretty easy to handle if you observe and inspect your Desert Rose often ...you'll see the pests and can take action.  Sometimes, the leaves are eaten by small worm.  If the trouble is not serious, just remove the worm out of the plant.

Sunday, July 3, 2011

What to do when cactus is rotting???

The before picture. 
when my mammillaria was still healthy in the big pot
Thailand is in the rain season now and some cacti in my garden were also rotten.  At this time, it happened with my favorite mammillaria which became rotten and I just noted it recently.  So I think it’s important to fight with rotting seriously although before that, I led the plant rot without do anything. Here is the way to do that and hope it’ll be helpful when you have same trouble like me.


  • How do we know or notice that the cactus is rotting?
The brown base of can mean that the plant is aging (become woody) or rotting. To tell the difference, touch the base and see if it is hard or flabby/soft. Hard means everything is OK. But, it’s soft, it means that plant is rotting and it must be treated with care.  

Here is after picture.  It was so soft and I had to cut some rotten part out and dried the rest for 3-4 days together with the rotting aloe

  • Can I still save the rotting cactus? 
The second way to save a rotting cactus is to simply cut of its top.  Using a sharp knife cut off the top of the plant.  After that, let’s it dry for a 2-7 days. Once dry, set about 1/2 the plant into potting mix/perlite or cactus mix/perlite.

Do not water too much. Just enough to make the soil to become a little humid. Over watering at this point could cause rot again. With luck and the right conditions it will start to root. Once it develops its own roots, the watering can be increased.  Establishing the new roots may take several days or weeks depending on the condition of plant and care.


I put them on top of pot with 100% perlite


After several days with humid from rain, the new root came out finally! 


Another option is to take a cutting or two for grafting which need skill & experience to do that.

  • What if my cactus is rotting from the top? What shall I do?
If a cactus is rotting from the top you need to act immediately before more of the cactus rots. Just like as if it is rotting from the base, carefully cut off the top of the cactus that is rotting. Dispose of the cactus top.

As for the bottom, clean it with a spray to make sure it does not catch the top's disease. Change the soil unless it looks as if the cactus can't take a repot. The remaining cactus should now be healthy. After a few weeks of extra care, start caring for it as for a normal cactus. It will not grow a new top or increase in height but it will grow branches which will grow.

Source: http://www.botanicalgarden.ubc.ca,  http://www.alexandgregory.com/


Sunday, June 26, 2011

Free seeds of Gymnocalycium cacti to get

Recently, my Gymnocalycium cacti flowered and gave me some seeds. I want to give them for free because they are too many for me and it'll be a good practice to grow normal cactus from seed.  Then you'll know to do it with another cactus which may need more advance experience.

In the past, my friend ever gave the free seeds, then I learnt how to plant cactus from seed and now I want to do it to other people, too. Here is the picture of mother Gymnocalycium.

But you may need to pay $2 for shipping.  (Please don't forget that I live in Thailand.  If you stay here, I'll send you for free!) So if you'd like to get those seeds, please send money $2 via Paypal.  Here is my account : thai_create@hotmail.com.  There are limited amount: 3 sets (about 20-30 seeds/set)

Sunday, June 19, 2011

Cactus vs Scale


Today topic is about the scale, one of common pest for cactus as the blog reader has asked me about how to heal the cactus when scale attacks.  Hope it'll be helpful for you guys.

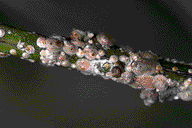
Scale is pinhead-size insects that present themselves as raised tan/brown spots. It is actually hard shell coverings that protect the insect or eggs underneath. Scales reproduce like rabbits, prefer columnar and rock cacti, and dine on plant juices. Infected plants appear yellow and weakened. Left untreated, scale can cause bud and shoot drop. Scale are treated similar to mealy bugs. 


Life cycle 
Scale and mealy bugs are related insects, and since their life cycles closely parallel each other.  In a general scale life cycle, eggs are produced beneath the female shell and hatch into tiny crawlers which are invisible to the unaided eye. Crawlers are not covered by a hard shell and they migrate to newly expanded foliage, finally settling near leaf veins on the underside of leaves or stems. It is this crawler stage, which is practically impossible to detect on cuttings or other propagation material that is responsible for spreading the infestation. 

Outbreaks of scale can be triggered by plants being under stress (overwatering/underwatering), too much new growth resulting from an overabundance of nutrients (overfertilizing), overcrowding (unavoidable in some collections) and other conditions specific to the infestation. These other conditions can include injudicious spraying that kills the predators but leaves the scale eggs alive, introduction of a new, more favorable host plant, etc.

scale on rose branch
How to rid scale? 
Many remedies are available for control depending on how much the scale outbreak. 

1. At the beginning, you may choose organic controls including alcohol spray (isopropyl alcohol, straight or diluted), soapy emulsion (can be mixed w/alcohol), horticultural oil (read the directions, taking the plant out of the sun is a must) and pyrethrum spray. 
Soapy water/alcohol should be reapplied every 2-3 days for 2 weeks. This is because little residual action can be expected, and newly hatched insects are occurring.

Alcohol in large quantities in the root zone is generally to be avoided since it can dehydrate some tissues. Soapy water/alcohol mix should not be allowed to dry in the root zone since damage can occur. If it is used, after a short period it can be flushed by pouring clean water through the root zone.

2. The most common and easy choice to remove scale is Chemical spray with proven results include Sevin and malathion.  DO NOT use sprays containing malathion on the Crassulaceae family of plants. These plants include the common Jade plants.  Some species in these genera are very sensitive to Malathion, and damage or death may result.   For your safe health, follow the pesticide instruction strictly when you use Malathion.

3.  Sometimes, spraying contact pesticides on scale is not effective since their protective hard shell coverings shed water like a well-made roof and the chemical ends up killing the natural predators (lacewings and their larvae that generally keep the scale under control in garden). 
Systemic pesticides can work but we should get rid of the alive scales, too.   They can't move, so once they are detached from the plant they will die. So you should scrape off the cactus scale by washing the plant with a weak detergent solution or by mechanically removing insects with a toothpick.  Then spray Malathion to control major infestations weekly. When fighting scale, be sure to cover the soil, otherwise, these pests will just drop off and then get right back on the plant. 

Information & Photo Source: http://www.cactusmuseum.com/, http://www.oldandsold.com, http://bugyou.blogspot.com/

Thursday, June 2, 2011

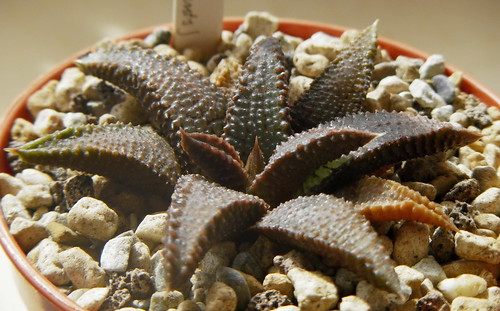
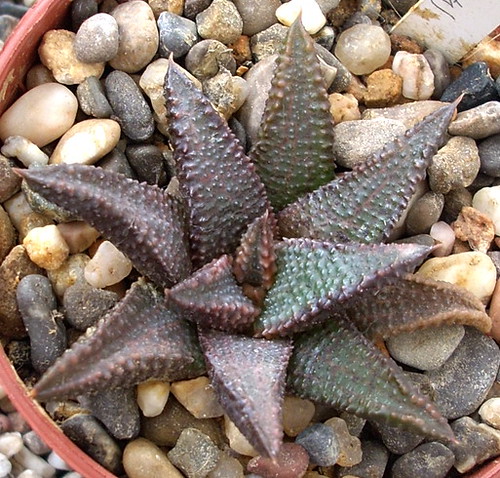
Haworthia koelmaniorum

Family: Aloaceae 
Genus: 
Haworthia 
Species: koelmaniorum 

Synonym: Haworthia koelmaniorum var. koelmaniorum, Haworthia limifolia var. koelmaniorum
Origin: South Africa (Mpumalanga: Pretoria area)


Hardiness:
USDA Zone 10a: to -1.1 °C (30 °F)
USDA Zone 10b: to 1.7 °C (35 °F)
USDA Zone 11: above 4.5 °C (40 °F)


Sun Exposure: Light Shade to shade (Its leaves can be burn if the sunlight is too severe.)

Growth Habits: Stemless rosette, very slowly clumping, 2 to 2.8 inches in diameter (5-7 cm); 14 to 20 leaves.
Watering Needs: regular water (every 3-4 days/time) 
Bloom Color: White/Near White
Bloom Time: Mid-late Summer, Early Fall
Foliage:
Grown for foliage
Evergreen
Blue-Green
Burgundy
Succulent
Leathery-Textured


Propagation Methods: By dividing rhizomes, tubers, corms or bulbs (including offsets) or leaf cuttings
From seed; direct sow after last frost, From seed; germinate in vitro in gelatin, agar or other medium.

 Other details: 
·       This plant is suitable for growing indoors like normal harworthia.   
·        Koelmaniorum grows slowly and can be rotten easily, too.  The plant is not cheap so its soil should be light and take care of it carefully.  You may mix the cactus soil and pumice in small size with the ratio 1:2.  I've been told that it worked.
·       Although Haworthia koelmaniorum naturally occurs in the summer rainfall area, the plants seem to have no problem when cultivated under similar conditions as their winter-growing relatives.

 Source: www.davesgarden.com, www.desert-tropicals.com/, http://desert-plants.blogspot.com

Wednesday, May 18, 2011

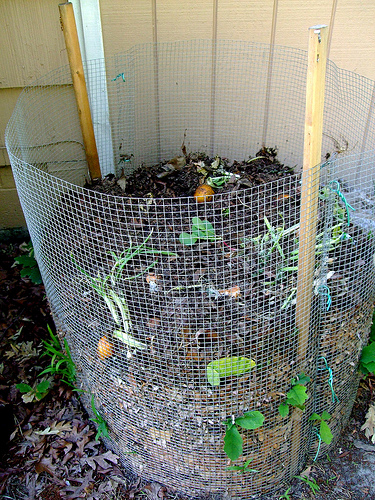
Making your own compost at backyard

What you do usually do with the dead leaves and food waste?  Composting is also a good answer to recycle leaves and other yard waste. Instead of burning or hauling away leaves, you can compost them and return the nutrients to your garden to save money with your own compost!

What is compost?

To gardeners, compost is considered "black gold" because of its many benefits in the garden. Adding compost to clay soils makes them easier to work and plant. In sandy soils, the addition of compost improves the water holding capacity of the soil. By adding organic matter to the soil, compost can help improve plant growth and health.

The composting process

The composting process involves four main components: organic matter, moisture, oxygen, and bacteria.
Organic matter includes plant materials and some animal manures. All composting require three basic ingredients:
  • Browns organic materials such as dead leaves, branches , twigs. The brown materials provide carbon for your compost
  • Greens organic materials such as grass clippings, vegetable waste, fruit scraps, and coffee grounds. The green materials provide nitrogen.
  • Water provides moisture to help breakdown the organic matter
The best ratio is 1 part green to 1 part brown material.  Shredding, chopping or mowing these materials
  1. Select a dry, shady spot near a water source for your compost pile or bin.
  2. Add your brown and green materials as you collect them, making sure larger pieces are chopped or shredded. Smaller pieces will help speed the composting process by increasing the surface area.
  3. Moisten dry materials as they are added.
  4. Once your compost pile is established, mix green material into the pile and bury fruit and vegetable waste under 10 inches of compost material.
  5. Optional: Cover top of compost with a tarp to keep it moist.
  6. When the material at the bottom is dark and rich in color, your compost is ready to use (this is usually occurs in two months to two years).
Tip:
  • If the pile is too dry, materials will decompose very slowly. Add water during dry periods or when adding large amounts of brown organic material. 
  • If the pile is too wet, turn the pile and mix the materials. Another option is to add dry, brown organic materials. 
  • Turning the pile is important for complete composting and for controlling odor.
  • Wait at least two weeks before turning the pile, to allow the center of the pile to "heat up" and decompose. Once the pile has cooled in the center, decomposition of the materials has taken place. Frequent turning will help speed the composting process.
my compost bag
  • You may also add layers of soil or finished compost to supply more bacteria and speed the composting process. Commercial starters are available but should not be necessary for compost.
(I live in the city and have limited garden space.  Therefore, I make my own compost in the soil/cement large bag (which water can go through) and shake it every 2 weeks.  About 2-3 months, the compost will be ready J.  You can adapt another bag or sack to make the compost.)

How long does it take?

The amount of time needed to produce compost depends on several factors, including the size of the compost pile, the types of materials, the surface area of the materials, and the number of times the pile is turned.

The number of times the pile is turned influences composting speed. By turning more frequently (about every 2-4 weeks), you will produce compost more quickly. Waiting at least two weeks allows the center of the pile to heat up and promotes maximum bacterial activity. The average composter turns the pile every 4-5 weeks.

With frequent turning, compost can be ready in about 3 months, depending on the time of year.
In winter, the activity of the bacteria slows, and it is recommended that you stop turning the pile after November to keep heat from escaping the pileís center. In summer, warm temperatures encourage bacterial activity and the composting process is quicker

Tips:
  • If the pile has more brown organic materials, it may take longer to compost. You can speed up the process by adding more green materials or a fertilizer with nitrogen (use one cup per 25 square feet).
  • ·When turning the compost pile, make sure that materials in the center are brought to the outsides, and that materials from the outside edges are brought to the center.

 Using compost in the yard
Incorporate compost into your garden as you prepare the soil in the spring. Cover the area with 3-4 inches of soil and till it in to at least the upper 6 inches of soil. 

Or you also use compost as mulch around flower beds, vegetable gardens, or around trees or shrubs in landscape beds. Apply a 3 inch layer. Be careful not to apply mulch close to the main stem or trunk of the plant.

Source: http://urbanext.illinois.edu, http://www.epa.gov/