Wednesday, September 26, 2007

Lophophora

Lophophora is a genus of spineless, button-like cacti native to the southwestern United States (Texas and New Mexico) through Northeast Mexico and South to Querétaro.
Literally, Lophophora means "crest-bearing", referring to the tufts of trichomes that adorn each tubercle. The name is derived from the two Greek words λοφος (lophos, the crest of a hill or helmet) and φορεω (phoreo, to carry).
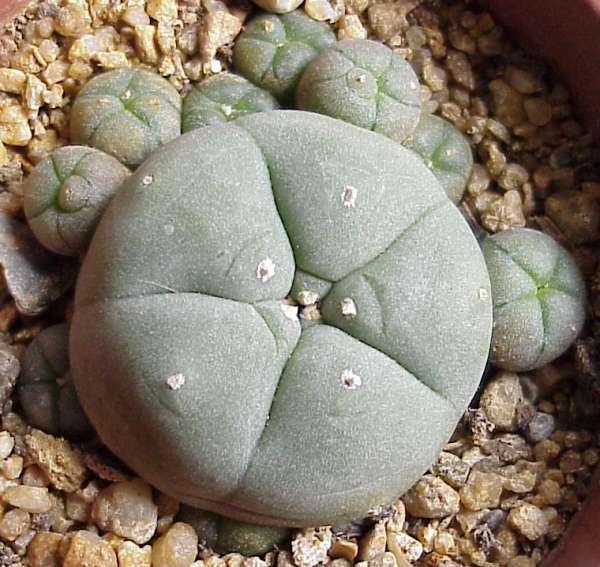
The species are extremely slow growing, sometimes taking up to thirty years to reach flowering age (at the size of about a golf ball, not including the root) in the wild. So the planter should be very patient. However, cultivated specimens grow considerably faster, usually taking between three to ten years to reach from seedling to mature flowering adult. Due to this slow growth and over-harvesting by collectors, the species are considered to be in danger of extinction in the wild.

Lophophora has been reported to be comprised of everything from one species, L. williamsii with varieties, to the four species L. diffusa, L. fricii, L. viridescens, and L. williamsii. Most modern authorities consider Lophophora to be a genus of two species, L. diffusa and L. williamsii. Recent DNA sequencing studies have shown that L. diffusa and L. williamsii indeed are distinct species. DNA evidence from the alleged species L. fricii and L. viridescens would allow for more accurate classification.

Pest
Lophophora suffer from mealy bugs and worse of all red spider mites. Red spider mite can disfigure a soft skinned plant like a Lophophora in a matter of days, it is then disfigured for a few years until you can grow out the marked skin. The red spider mites are tiny and almost invisible to the naked eye but you will see the fine webs across the surface of the plants.

There is no doubt that prevention is better than cure and our plants are sprayed routinely with Spider Mite Control and Buzz Off. These are organic products and are not absorbed into the plants epidermis. Another pesticide

Lophophora can take a lot of watering growing in this soil mix, rainwater is best but tap water is also fine. According to the experience of writer who lives in UK, his plants were out with no protection from April until October 2005 with the soil wet almost every day of the season. The result: healthy fat plants with a much better colouring than those grown in the glasshouses and with no pests.The plants were fed with a 12.5-25-25 fertilizer, every two - three weeks.

Source: wikipedia and www.divinecactus.com

Monday, September 3, 2007

Tips to control pests in the organic ways


1. Learn about the plants and the weeds and bugs that affect them.


2. Choose the right plants. Plant native species whenever possible. Native plants are better protected by their own “immune systems” and their relationships with other plants and animals in the area. You may also look for plants that are pest-resistant.


3. Diversifying the garden with a variety of plants will help the plants protect each other from pests. For example, small flowered plants like daisies, mint, and rosemary attract many insects that eat the pests. Check with a local garden shop or nursery for recommendations.


4. Maintain healthy, fertile soil by rotating your plants, adding compost, and mulching.


4. Plant early to avoid the worst bug season.


5. Allow growth of the pests' natural predators. Ladybugs, ground beetles, and birds eat many pests, and fungi and moss can infect the pests naturally. Spraying chemicals often kills the beneficial bugs too.


6. Get out there and work with your hands! A hoe, spade, and your hands are the best tools to combat weeds. Getting close to your plants will help you identify problems and remove pests and damaged plants by hand. Pruning plants helps remove diseased parts, leaving the plant's nutrients for the healthy parts. Always prune back to a main branch or stem; leaving "stubs" opens a door for pests.


7. Keep a garden journal in which you record when you see pests, what they look like, what they have done to the plants, and the actions taken. In this way, you will learn what works and what doesn't while experimenting with new techniques.


8. What's That Smell? Grow herbaceous plants herb aceous plant whose stem is soft and green and shows little growth of wood. The term is used to distinguish such plants from woody plants. that naturally repel pests. One of another solution is to grow garlic around roses. Aphids hate the stuff, and it will go a long way in deterring them. Other insect deterrents that you might try are marigolds and citronellacitronella, a fragrant grass, the source of a volatile oil used in perfumes and insect repellents.


9. Create a Bird Sanctuarybird sanctuary: see wildlife refuge. Use feeders, baths, and nest boxes to attract birds into your yard. Not only will garden pests diminish, but you'll also have the pleasure of enjoying the beauty of these welcome visitors.


10. When all else fails, use barriers like chicken wire to protect your prize tomatoes— try drenching mine with hot pepper spray and the rabbits attacking them just laughed.


11. Know the rodents and other animals that might visit your garden; visit your local USDA extension for information.


Source : www.thegreenguide.com and www.organicgardenpests.com

Tuesday, August 21, 2007

Mammillaria haageana ssp conspicua

Body: Plants usually solitary.


Radial spine: 18 - 30, smooth, white, radiating, bristly, 3 - 6 mm (to 0.2 in) long.


Flower: Deep magenta pink to pale pink


Frost Tolerance: Hardy to at least 25°F (-4°C) for short periods

Minimum Avg. Temperature: 50°F (10°C)

Sun Exposure: Light shade

Origin: Mexico (Puebla, Oaxaca, Morelos) Altitude 600 - 2.600 m

Growth Habits: Solitary, up to 16 inches tall (40 cm), 4 inches wide (10 cm)

Watering Needs: Water sparingly, needs good drainage

Friday, August 17, 2007

Planting, Fertilizing and Watering Your Roses


Planting Roses

The art of planting roses doesn't have to be a complicated thing to do. When you have the right knowledge there is no limit to how beautiful a garden or rosebush that you can create.

With the extensive manual at hand, you will never have to buy another bouquet again. Now you will have all of the beauty and delicious fragrance that roses can give you with you all the time.

Here are some of the best ideas and tips for planting your roses:

1. Check with your local gardening center or florist for the best type of roses to grow in you climate. If you are a novice, you should look for disease resistant types of roses because they require a lot less maintenance.

2. When planting roses, you want to pick a spot that is well lit in the morning. You also want an area that is sunlit for at least 6 hours a day. Roses need a great deal of light if they are to grow properly.

3. Pick an area that has plenty of well drained soil. Great soil has a PH level where the amount of acid in the soil is at about 5.5-7.0. You can get a testing kit for your soil at any garden center.

4. Organic matter like manure or lime helps to nourish the roots of your roses. You should soak the roots in water or puddle clay for many minutes, and cut off the root's ends that are broken.

5. The first 3-4 weeks after planting your roses, you should water them often. Usually this is when the top 2 inches of soil is dry. Roses need a lot of hydration and food to remain healthy.

6. Four weeks after planting, you should start soaking the bed every 2 weeks or so. You should do this in the morning for the best results.


7. Begin fertilization approximately 3 months after planting. Use 3-6 inches of mulch to control the moisture, temperature, and to stops weeds from coming up. Mulch also helps to lock in the vital nutrients your roses need in order to remain healthy.

8. Planting in the Spring is the best.


9. You want to plant your roses in an area that is well circulated with air. Your roses will not grow in an enclosed or tight area.

10. Dig a hole that is two times bigger than the amount of space that your roses take up. It makes it easier to plant them and creates a spaced area for them to grow with freedom. Poor circulation for your roses can cause fungal diseases. Using a larger hole also makes it easier for you to pull them up later and pot them if you'd like.

Watering Your Roses


Watering your roses can be a tricky thing. It is one of the most important aspects of taking care of your roses. Roses need almost as much water to stay healthy as people do. Of course there are quite a few things that must be considered before you water your roses.

They are as follows:


  • Like people, roses need more water during the hotter weather than during the colder ones. Heat makes the soil dry faster and the roses get “thirstier”.
  • Keep in mind that even during the rainier times, roses still need to be watered with fresh water because rain alone cannot provide the right amount of moisture for your roses.
  • You want to water your roses in a manner that goes deep enough into the surrounding soil so that it reaches the roots. Try going approximately 45cm deep.
  • You do not want to water the petals directly or the canes because it can cause fungal disease in your roses.
  • To help you lower the risk of your roses getting diseases, mulch is a nice way to keep the soil moist, without allowing all of the fungal problems that too much moisture can cause.
  • Watering your roses in the morning also helps to dry the dew off of the leaves.

  • Once your roses are fully established, you should water them once a week. You should do it twice a week if its in the hotter months.

Fertilizing Your roses

It is really important to fertilize your roses. That is how your roses get their much needed nutrients. Roses are much like people in the things that they need in order to remain healthy. Just like people they need water and food (fertilizer).Most types of roses have to be fertilized frequently to keep them growing at a fast pace. You should fertilize with a fertilizer that is slow to release like fish emulsion or Osmocote at planting time. Be certain to follow the instructions properly from the label.Avoid over fertilizing during the winter because by trying to promote new growth in the winter will make your roses more available to freeze damage.Important Tip: You should never fertilize plants that are heat or water stressed. Water stressed plants that grow under a lot of heat will cause leaf and bud burn.You want a steady temperature of approximately 70-80 degrees because your plants will get the most nutrients that are available to the plants. During the growing season, you can give the plants a water soluble fertilizer every two weeks.


Give Your Roses a Springtime Boost


Every spring people get a boost of energy. It is like the very air in the spring time is rejuvenating in itself. Natural passions and new loves are often born in the spring, and old loves get a nice spark between them. Spring is definitely the best time of year.The same goes for roses. It is in the spring that people begin planting or replenishing their rose gardens. For those bushes that are already established, spring is the time to see new buds and blooms trying to be born.


If you are interested in helping your roses get an even bigger boost in the spring, you may want to try this special tonic that is used to give your roses a strong boost of all of the nutrients that your roses need in order for them to grow strong, healthy and produce a lot of buds.


Source: www.basic-info-4-organic-fertilizers.com

Friday, August 10, 2007

How To Deal With Black Spot Leaf Disease

You may ever have trouble and don't know what to do when your plants have disease. Here is the video clip showing how to handle with black stot leaf disease.


Tuesday, August 7, 2007

Mammillaria parkinsonii

Body: Plants solitary at first, later branching dichotomously. Stems depressed globose to cylindrical, blue-green, to 15 cm (5.9 in) high, 10 - 15 cm (3.9 - 5.9 in) in diameter.

Radial spine: 30 or more, fine, white, slightly curved, 4 - 6 mm (0.2 in) long.

Central spine: 2 - 5, usually curved slightly downwards, stiff, whitish with dark tips, upper ones 6 - 8 mm (0.2 - 0.3 in) long, lower ones to 38 mm (1.5 in) long.

Flower: Pale yellow with red midveins, 12 - 15 mm (0.5 - 0.6 in) long and in diameter.

Seed: Brown.Flowering period in Cultivation (Europe):

Frost Tolerance: Hardy to at least 25°F (-4°C)

Minimum Avg. Temperature: 50°F (10°C)

Sun Exposure: Light shade

Origin: Queretaro, Mexico.

Comments: One of the species with the capability of forming very large clumps. In order to keep the clumps tightly formed, high light levels and steady growth are needed; otherwise there is the danger of having a number of elongated heads that are somewhat separated from one another. This species is especially variable in spine length.

Synonymes: M. auriareolis M. cadereytensis M. dietrichiae M. neocrucigera M. parkinsonii var dietrichiae M. rosensis

Monday, July 30, 2007

Growing Sunflower


Growing sunflower can be a fun activitiy for adult and kid. Moreover, you can cut flower as for your house decoration or harvest its seed.

It is very important to carefully consider the types of sunflowers you intend to grow and where and how you intend to grow them.

Carefully select your seeds reading all of the information on the seed packs. Pay attention to the height of the plants, and the time to bloom, and the type of flowers.

Consider whether you are planting for cut flowers, or planting to harvest and roast seeds for eating. Maybe you want to plant your sunflowers in pots or create a barrier of sunflowers between you and your neighbors. Seeds for every type of planting are readily available. You just need to have some idea about what you want from your garden.

Sunflower seeds, in a number of varieties, are available at most local garden nurseries. Or you can buyw with mail order catalogs.


Preparing the seeds
It's a good idea to prepare the seeds before planting. It can ensure that you will not waste all seeds.

Cover the seeds in the tissue or towel paper and damp the paper with paper. Leave the seeds in the wet towel paper for 4-5 days BUT you should check every day that the paper are damp. If not, you should spray water to the paper. If the seeds begin to sprout, it means that the seeds are ready to be put into the soil.


Soil Condition

Sunflower plants are like any other plant. The better the soil the more heartier and robust the plant but sunflower are tolerant of heat and drought. The sunflowers like a soil that drains well and contains a lot of mulch. About two weeks before planting, you should mix a bit of steer manure into the soil.

Sunlight

The minimum sunlight is 6hrs a day to grow healthy plants. However, full sun is suggested for the better part of the day to grow strong healthy sunflowers.